Description
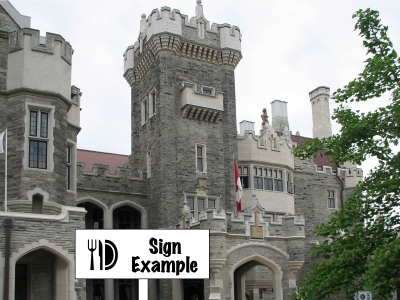
Add clouds and a blue sky gradient to your skies (for "burnt-out" / burned-out white skies).
Note: If you just want to add some colour to the sky, and don't need to generate clouds, you may to use the simpler Blue Sky Gradient script.
You can find the script at the GIMP Plug-In Registry. After you install the script (download and place in
your script folder), refresh your scripts ([Menu] –> ).
You will find this script under
[Menu] –> .
(If you have trouble, revisit the main GIMP Corner page for more information about the GIMP and using plug-ins).
Using the Script
Find a Threshold Number
The trick to running this script successfully is to choose the best threshold number. You can test this out beforehand by selecting Threshold from the GIMP menus
([Image] –> ),
then move the slider until you find the most accurate division between the sky and the rest of the photograph.
Don't worry if it isn't perfect -- You can always edit the mask later. Choose Cancel after you discover what this number is.
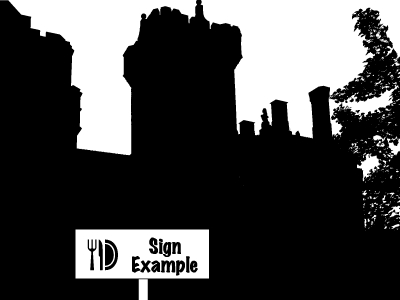
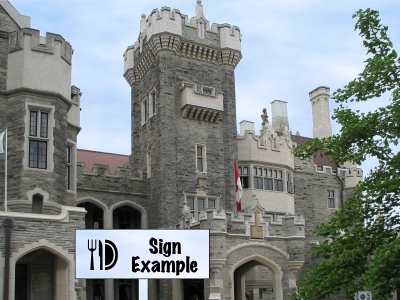
In our example, we found the best value for our threshold number was 234. See the illustration to the right:
Run the Script
Next, run the script ([Image] –> ). The input for our example photo is pictured at right:
Notice that we enter the threshold number, 234, that we found in our earlier step. For this example, we are accepting the default colours, but both of these can be changed.
If you don't want a gradient effect, then choose the same colour for the top and bottom.
Keep in mind that the script assumes the horizon in the photograph will be level, and that the gradient is calculated from the top to the bottom of the photo, regardless of where the actual horizon line is. Therefore, you will usually want to enter a slightly lighter colour for the bottom sky colour than what you're hoping for at the horizon.
The feather amount lets you adjust the edges of the threshold mask.
"Add Rendered Clouds" lets you choose whether or not you want the cloud layer to be rendered.
Unless you are certain you won't need to do any additional adjustments, leave the "Flatten Image" option unchecked.
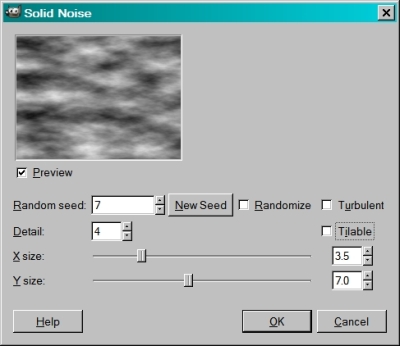
If you chose to render clouds, the "Solid Noise" interactive dialogue will come up, as pictured at right.
You can experiment to find the settings that give the most desirable results, or click on Help for more information about this plugin.
After Running the Script - Fine Tuning
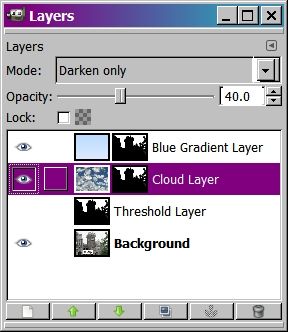
After running the script, we see that two or three new layers have been created:
- Threshold Layer - showing the threshold chosen for the layer masking
- Cloud Layer - solid noise with the layer mask applied (if the "Add Rendered Clouds" option was chosen)
- Blue Gradient Layer - the blue gradient colour layer with layer mask applied
In order to adjust and fine-tune the layer mask, the "Threshold Layer" needs to be edited, and then pasted into the layer masks for the other layer(s).
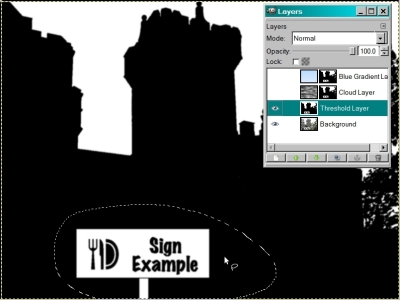
In our example, the white sign needs to be masked out. Click on the layers in the layer dialogue so that the "Threshold Layer" is visible, and the layers above it are not (visible layers have the eyeball  in front of them).
Edit using something like the lasso tool
in front of them).
Edit using something like the lasso tool  to select the area, then Fill with Black ([Image] ).
To work with smaller areas, use one of the brush tools.
to select the area, then Fill with Black ([Image] ).
To work with smaller areas, use one of the brush tools.
When this "Threshold Layer" is edited to your satisfaction, you need to copy it into the layer masks for the top active layer(s).
While still on the "Threshold Layer", Select All (Ctrl-A or [Image] from the menus), and choose Copy (Ctrl-C or [Image] from the menus.
Then, click on the layer mask of the layer you want to apply the newly edited mask to -- A white rectangle shows around the thumbnail in the
layers dialogue to indicate the active layer/mask. Then choose Paste (Ctrl-V or [Image] from the menus).
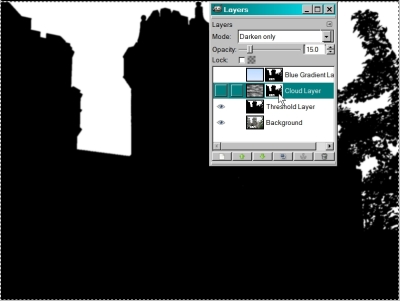
In the example at right, the active layer we are pasting into is the layer mask of the "Cloud Layer".
Your pasted selection shows up as a "Floating Selection" (as at right), and you need to anchor it into the currently selected layer -- Anchor (Ctrl-H or [Image] from the menus.
Finally, toggle the visible layers again, so that the "Threshold Layer" is not showing and the "Cloud Layer" and/or "Blue Gradient" Layer are.
The layer modes and opacity can be adjusted as desired -- the sky colour can be changed, darkened or lightened; the cloud effect can be lessened or increased.
Additional Tips & Information
Of course, it is not necessary for the sky to be blue. This script can be used for other colours or applications. You could also replace the cloud layer with a cloudy sky from another photograph and just make use of the masking.
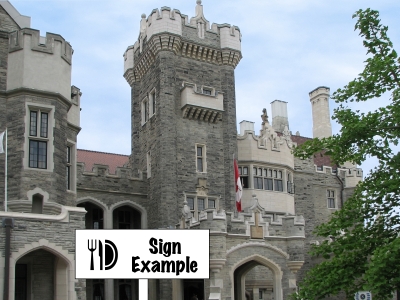
Sky Substitution Example
To create the image at right, we started with the same original photo as the examples above. We ran the same "Blue Sky & Clouds" script, with 234 as the Threshold value, 1 as the Feather value,
and selecting "Add Rendered Clouds."
The Threshold Layer is adjusted, as per the examples above, and copied to the other layer masks.
Then the photograph of the clouds is copied and pasted into the "Cloud Layer."
Finally, the layers are adjusted so that the "Cloud Layer" is set to 40 Opacity, while the "Blue Gradient Layer" is set to 70 Opacity.